As promised today is the day I share the instructions on how to make the first piece of jewellery I ever made!
When I was 11 I went to a mother/daughter craft day. The subject jewellery making. It was there that my passion for jewellery making was ignited. We only started with the basics (paper beads, felted beads, machine embroidered work) and I wasn’t to learn about working in silver for another 8 years but I’m not sure I’d be who I am today without having been on that fantastic day. I don’t know if I ever told my mum that or really thanked her for it. I guess nows the time. Thanks mum!
Now for the tutorial…
How to make paper beads
- Paper (colourful magazines, wrapping paper, flyers, etc)
- Cutting mat
- Scalpel/ craft knife
- 30cm ruler
- pen
- cocktail sticks
- glue
- Varnish (I find quick dry clear nail varnish works well)
- Polystyrene or something similar to stand the cocktail sticks in while the varnish dries.
(If you don’t have a cutting mat and craft knife a good pair of scissors or a guillotine will work just as well.)
1 .
Cut out a rectangle the length of your piece of paper. The width of the rectangle dictates the length of the bead. I usually make them 4cm long. The length of the paper dictates the circumference of your bead. The longer the paper the fatter the bead. (see Paper beads/earrings instruction sheet for a diagram).
2.
Cut diagonally across the length of rectangle to make two long right angled triangles.
3.
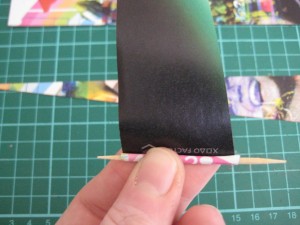
With the ‘wrong’side of the paper facing towards you start to roll your paper around the cocktail stick. It can be a bit difficult at first. I tend to roll it back and forth a few times to make it flexible and forming around the stick.
4.
When you have the paper started off glue across the strip and roll to secure it.
N.B. – Make sure you don’t roll it too tight. The cocktail stick needs to be removed later, so give it a little freedom but not too much. (a bit like my fiancé in the kitchen 😉 )
5.
Get your glue and glue the rest of the strip. Roll the bead tightly. Maintaining the 90 degree straight edge when you roll is vital! This will be the bottom of your bead. If it does start to deviate, give it a little push/tap to flatten it out again. When you have finished it should be cone shaped. (see video below)
6. Repeat steps 3-5 to make your second bead.
7.
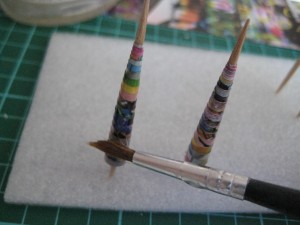
Last but not least stick your coctail sticks in your polystyrene and give your beads a coat of varnish. This will give them a nice glossy finish and protect them from the elements. Don’t forget to coat the bottom of the bead too.
Once dry your beads are ready to be made into whatever you so wish (earrings, bracelet, necklace, etc).
There will be a slight colour difference between your beads, especially if you use the two that made up the same rectangle. If you want them to match as closely as possible I recommend making a batch then matching them together.
To make barrel shaped beads, the starting paper is slightly different.
You need to start with an isosceles triangle. Here’s how I make mine…
- Measure 10cm from the edge on each side of your paper, marking each 2cm point (2, 4, 6, 8, 10).
- From the corner of the bottom edge of your paper (0 cm) draw a diagonal line to the 2cm point at the opposite side.
- Join this point to the 4cm mark on the side you started from.
- Repeat until you have drawn out two 4cm wide isosceles triangles and two 2cm wide right angled triangles. (see pictures below).
5. When you have your isosceles triangle shapes (the two larger ones in the above picture) cut out, repeat stages 3 onwards of the cone bead tutorial but keep the point of your paper rolling towards the centre point of the bead.
The small 90degree triangles make the cutest little beads.
As I said before the width of your piece of paper is the overall length of you bead. If you want to make beads that are much longer, bamboo barbeque skewers are fantastic but they are also good for rolling a series of beads on one stick. I’ve included a PDF instruction sheet I made for some students a few years ago. Hopefully it covers any points I may have forgotten in the blog. Feel free to print it off and share the bead making bug. Hope you enjoy making them as much as I did all those years ago.
Paper beads/earrings instruction sheet
Next bead making tutorial will be plastic bag beads. Keep your eyes peeled.
TTFN. Laura.xxx


